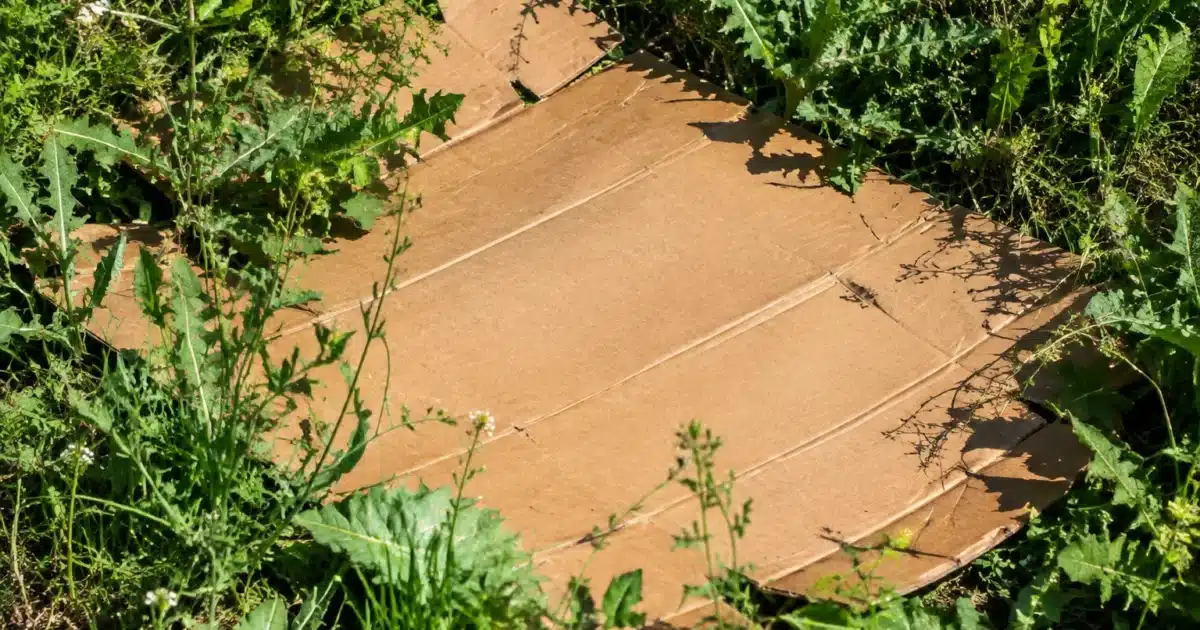
You stare at your flower bed overrun with couch grass and the thought of breaking out the spade makes you exhausted already? No need to turn over the soil. A simple brown cardboard box, placed in the right spot, is enough to smother weeds in a few weeks, without lifting a single bit of earth.
The method has been known to permaculture enthusiasts for a long time, but it remains underused. It involves covering the soil with a thick cardboard box, then placing plant-based mulch on top. Deprived of light, the existing vegetation dies off in a few weeks, while the soil warms up, becomes moist, and turns crumbly beneath the cover. Result: soil ready to plant, without having turned over a single clod.
Why cardboard laid on the ground replaces digging and blocks weeds
Turning over the soil breaks down the soil structure and destroys some of its microbial life, as explained in the article about why immediately turning over soil hardened by summer isn’t the best solution. Cardboard, on the other hand, works the other way: it protects living soil instead of disturbing it. By blocking light, it prevents photosynthesis of the weeds already in place, whether bindweed, couch grass, or stubborn grasses. Without light, these plants exhaust themselves and eventually disappear, roots and all for the less hardy ones.
It’s a way to naturally weed without chemical products and without hand-pulling for hours, much like this mulch laid before the September rains that replaces two months of weeding. The technique fits the logic of lasagna gardening: you layer organic materials that decompose slowly, nourishing the soil over the coming months. The cardboard plays the role of first barrier, the one that stops any regrowth while decomposition takes hold in the depths.
How to lay cardboard in the vegetable garden: simple steps for effective mulching
Everything starts with choosing the right material. Ordinary packing cardboard, with no colored ink or plastic adhesive, works perfectly. Avoid plasticized or varnished cardboard: it doesn’t decompose and leaves residue in the soil.
Choosing the right cardboard
Simple brown single-wall corrugated cardboard is the most suitable. It’s easily found in moving or household appliance boxes, often free from local shops. Systematically remove all tape, labels, and metal staples before using it. The thicker the cardboard, the longer it takes to decompose, which extends its effect against the toughest weeds.
Installing and securing cardboard without mistakes
The process takes just a few simple steps, but each one matters to guarantee lasting results:
- Mow or cut back existing vegetation flush with the soil to ensure direct contact between the cardboard and the earth.
- Lay cardboard sheets overlapping by at least 20 centimeters to prevent weeds from sneaking through gaps between sheets.
- Water the cardboard generously to start decomposition and press it down to the soil.
- Cover with a thick mulch layer, straw, fallen leaves or dried grass clippings (see how a handful of fallen leaves can enrich soil more than some bagged store-bought amendments), to hold down the cardboard, retain moisture, and keep it from blowing away in the wind.
This covering step is also what makes the process discreet in an established flower bed: the cardboard disappears beneath a layer of vegetation that looks like classic mulch.
Never kill
another plant.
Take a photo: the app names the species, spots the problem and tells you exactly what to do.
What happens under the cardboard after 30 days: crumbly soil, smothered weeds, soil life preserved
After a month under cardboard, the change is clear. The soil is crumbly, darker, easier to work by hand. Earthworms and microorganisms have continued their activity sheltered from light, unlike what happens after traditional digging when soil is exposed and dries out quickly.
The weeds in place have yellowed, then bent over and decomposed into themselves. Couch grass, notorious for being hard to eliminate, also eventually gives up if the cardboard stays in place for several weeks without light exposure. The heat stored under the cover, combined with constant moisture, creates ideal conditions for cardboard decomposition and soil biological activity.
Tap to scan your plant
This feature requires the Plantalya app. Scan any plant instantly with your camera!
The right seasonal cue
In spring, the technique prepares a flower bed for summer planting. In autumn, it mainly serves to protect the soil through winter and to find it crumbly when frost thaws, without having turned a spade even once.
Mistakes to avoid and precautions to take
The main mistake is laying cardboard that’s too thin, or cardboard with holes that let light through in places. Weeds then find the slightest gap to keep growing, forcing you to start over. Also avoid cardboard printed in color or covered with a plastic film, whose components don’t decompose properly and can slightly contaminate the soil.
Another point to watch: stagnant excess moisture under poorly ventilated cardboard can encourage slugs or certain fungi, especially if the mulch layer on top is too compact. A good compromise is an aerated mulch layer that lets air circulate while retaining moisture needed for decomposition.
Finally, patience and consistency beat rushing. Cardboard removed too early lets the hardiest weeds start growing again. It’s better to leave it in place for several weeks, even a whole winter for the most overgrown plots, before installing crops. It’s an ecological method, inexpensive, that mainly demands consistency rather than equipment.
Never kill
another plant.
Take a photo: the app names the species, spots the problem and tells you exactly what to do.